
How to make one, and what you can do with it.

A recovery drive is similar to the media you’d receive if you bought a pre-built system. Back in the day, PCs would ship with a CD or DVD that included an image of the system as it left the factory. If your PC’s OS went sideways, you could easily revert to the way things were on day one (though you’d lose all of your subsequently created data and applications, obviously). Nowadays manufacturers usually just put an image of the system as it left the factory on a hidden partition of your main drive.
A Windows recovery disk builds on this idea. In addition to letting you reinstall Windows, it includes several troubleshooting tools, which can be a lifesaver if your system won’t boot.
Some of these tools used to be part of the OS. If your PC failed to boot you were presented with a menu allowing you to try and boot into Safe Mode, or use “last known good configuration.” That’s no longer the case with Windows 10. Now you need these tools to reside on a separate, bootable USB key, and every person running Windows should keep one in a safe place with the label “in case of emergency.”

Here’s how you create one and what it can do for you.
First, obtain an 8GB to 16GB USB key. Next, go into Windows’ Control panel (right-clicking the Windows icon is the easiest way) and type create a recovery drive into the search bar. The manual method would be to go to System & Security > Security & Maintenance > Recovery.
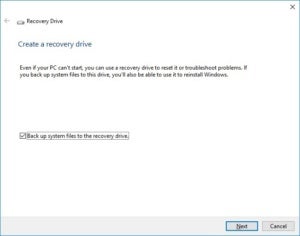
You may need to enter your admin password to go further. In the resulting dialog box, check the box labeled Back up system files to the recovery drive.
With your recovery drive created, you’ll have to boot from it in order to use it. How your PC boots from USB varies according to your PC’s age and motherboard, but typically you can press one of the F-keys during boot to arrive at a boot selection window. From there you select the USB key you’re using, and it should proceed to boot from the recovery drive. When you successfully boot from it you’ll see the following options. Here’s what each of them does:
The first window gives you essentially two options: Recover from a drive, and Advanced options.

The first option lets you re-install Windows. Note that it says you will lose all your data and installed applications. This is a clean installation of Windows, not a restore from backup or something along those lines. This is the nuclear option, in other words.
The second option, which is labeled Advanced Options, lets you fix your Windows installation in several ways, and brings you to the following menu:

The Advanced Options menu allows you to do the following:
System Restore: Use this to revert your PC to a happier time, when things were working normally. This does not affect your data, but it does affect installed programs as it replaces the registry with an earlier version.
System Image Recovery: If you’ve used the image backup tool in Windows 10, this would be where it would come in handy. You can restore the image of your PC at the time you created the image, which includes all your data and installed programs at that time.
Startup Repair: This is sort of a “black box” in that it tries to fix whatever issue is preventing the system from booting, but it doesn’t tell you what it’s doing or, if successful, what the problem was. This is the first thing you should try, as it’s the quickest and least invasive.
Command Prompt: This can be useful for a wide array of tricks and tactics, most especially running the SFC /Scannow command to scan and fix corrupted system files. We all know the command prompt is a wizard’s toolbox, and if you know what you’re doing the possibilities are almost endless.
Go Back to the Previous Build: Though worded a bit cryptically, this lets you revert your PC to the previous build of Windows, meaning the one before whatever update turned everything pear-shaped.
As you can see, it’s quite useful to have one of these recovery drives handy. Do yourself a favor and make one now.
source”cnbc”